How to Make Coffee Using a Stovetop Percolator? (Correctly)

Percolators help you brew coffee that exudes rich, bold flavors and an unmistakable aroma.
While modern coffee makers have taken the spotlight in recent years, the classic stovetop percolator remains a timeless and beloved method for coffee aficionados who appreciate the art of brewing a perfect cup.
Whether you're a seasoned coffee connoisseur or a curious beginner eager to explore the world of stovetop percolators, today, I'm going to show you how to make coffee using a stovetop percolator.
What is a stovetop percolator?
A Stovetop percolator is a classic coffee-making device, aptly named because it is designed to be used on a stovetop or any direct heat source. This method of brewing coffee has been a beloved tradition for generations.
Unlike electric percolators, which have heating elements built into the device, stovetop percolators require an external heat source, such as a gas or electric stovetop or even a campfire, to brew coffee.
Stovetop percolators are cherished for their simplicity, durability, and portability, making them an excellent choice for outdoor enthusiasts and those seeking a more traditional and authentic coffee-making experience.
Here's how it works:
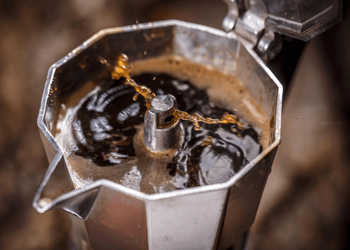
Water in the lower chamber is heated on the stovetop, and as it reaches a boiling point, it's forced up the tube and over the coffee grounds, creating a continuous cycle of percolation. The result? A robust and aromatic cup of coffee.
Things you need to make coffee in a percolator
Now that we know what we're dealing with, let's talk about the tools of the trade. Making coffee in a stovetop percolator requires some essential items.
So, here's what you'll need:
1) Stovetop Percolator
First things first, you'll need a stovetop percolator. It comes in various sizes, so pick one that suits your caffeine consumption level.
2) Coffee
Obviously! Use freshly ground coffee beans. It's like giving your taste buds a front-row ticket to a flavor concert.
3) Water
Opt for filtered or bottled water to ensure a clean and crisp taste. After all, coffee is about 98% water!
4) Heat Source
To make coffee in a camping percolator, you'll need a stove or a heat source to work your coffee-making magic.
5) Grinder
If you don't have pre-ground coffee, a grinder is your best friend. Coarse or medium-coarse grind is ideal for percolators.
6) Measuring Scoop
A measuring scoop or spoon can help you accurately measure the right amount of coffee grounds.
7) Mug or Cup
You'll need something to pour your liquid gold into when it's ready to be savored.
How to make coffee using a stovetop percolator?
Step 1: Grind and Measure Your Coffee
Ensure you have a reliable burr coffee grinder and your favorite coffee beans before you begin. Percolators require coarse-ground coffee, such as that used in a French press.
Make sure that your grinder can produce this particular grind size. Achieving the appropriate coffee-to-water ratio is critical for making a delicious brew. The size of your stovetop percolator will determine how much coffee you use.
A general rule of thumb is to use one spoonful of coffee per cup of water. Consider using a coffee scale to assure accuracy.
Any remaining coffee grounds should be kept fresh in an airtight container until your next brewing session.
Step 2: Assemble and Fill the Percolator
Install the pump stem in your percolator if you haven't already. Afterward, dispense cold water into the reservoir. Put your freshly ground coffee beans in the percolator's filter basket.
A percolator naturally produces strong coffee, so be careful not to overfill; less is more. Put the lid on your filter basket if it has one, then shut the percolator.
Please remember that the assembling method may vary depending on the brand and kind of percolator. Consult the manufacturer's instructions for advice if you run into any issues.
Step 3: Turn Up the Heat
Put your filled percolator on a stove burner (or a camp heater if you're camping). Set the burner's heat to low or medium for a slow process.
Don't boil the water, as this can cause the tea to be over-extracted and taste burnt. Watch for steam and bubbles from the percolator's glass knob on top.
These bubbles should pop now and then, only some of the time. Change the heat as necessary to keep this setting.
Step 4: Let It Perk
Set the timer for a maximum of 10 minutes. Some coffee connoisseurs prefer shorter brewing times (around 6 to 8 minutes), but the potency of your coffee depends on how long you let it percolate. Experiment with timing to discover the optimal brew.
Step 5: Remove It from the Heat
Turn off the burner and carefully remove the percolator from the heat source once the timer has expired. Take care because the percolator will be extremely hot. To protect your hands, use an oven mitt or a kitchen towel.
Remove the used grinds from the filter basket before pouring your coffee. Because certain percolators do not have good seals between the basket and the reservoir, leaving them in may result in a gritty cup of coffee.
Step 6: Keep an Eye on It
Do not become distracted during this crucial phase. Observe the coffee percolator. When the coffee has reached a deep caramel color, it is ready to be removed from the heat. Consider that perseverance is a virtue.
Step 7: Pour and Savor
Remove the percolator from the heat source and cautiously pour the liquid substance into the prepared cup.
After throwing away the coffee grounds (which you can put in your trash), put the percolator lid back on and pour yourself a hot cup of coffee. Savor the rich, intense flavor you've made, and be proud of what you've done. You deserve it.
Best practices to follow when brewing with a stovetop percolator
Now that you've mastered the art of stovetop percolator coffee, let's explore some best practices to ensure your brew is always top-notch:
1) Use fresh Coffee Beans
The foundation of a great cup of coffee in a stovetop percolator is using freshly ground coffee beans. When you grind your beans, they release aromatic oils and flavors. By using fresh grounds, you ensure that these rich and intricate flavors are preserved in your brew. Invest in a high-quality burr grinder to get a consistent grind size that suits your percolator.
2) Right Water Temperature
It's essential to start with cold, fresh water when filling your percolator. Hot tap water can contain impurities or off-flavors that affect the taste of your coffee. Cold water allows for a slower and more controlled heating process, ensuring that your coffee extracts the best flavors from the grounds.
3) Right Grind Size
Your coffee's grind size has a big impact on the brewing process. For stovetop percolators, opt for a coarse or medium-coarse grind.
This grind size allows water to flow through the grounds without over-extracting them, which can lead to bitterness. A consistent grind size is crucial to achieving a balanced and flavorful cup of coffee.
4) Don't Overdo It
Over-percolating is a common mistake to avoid. Remove it from the heat source once your percolator starts bubbling or reaches that perfect, rich color.
Leaving it on the heat for too long can result in over-extraction, leading to a bitter and unpleasant taste. Timing is key, and finding the sweet spot for your brewing time is perfecting your coffee-making technique.
5) Experiment
Brewing coffee with a stovetop percolator offers a unique opportunity for experimentation. Everyone's taste preferences differ, so feel free to adjust the coffee-to-water ratio and brewing time to suit your palate.
You might discover a stronger or milder cup that you love, and this flexibility is what makes percolator brewing so enjoyable. Keep a journal of your experiments to remember what works best for you.
FAQs
1) Why is your percolator coffee bitter?
Using excessively heated water or allowing the coffee to percolate for too long can result in bitter coffee. Find the ideal combination by experimenting with shorter steeping times and lower heat settings.
2) How to clean a stovetop percolator?
Disassemble your percolator and wash all its components in tepid, soapy water to clean your percolator. Particular attention should be paid to the receptacle and stem, as coffee oils can accumulate there. Before reassembling, thoroughly rinse and air-dry all components.
3) Can you use filters in the percolator?
Traditional stovetop percolators do not require filters because they contain a metal receptacle for holding the coffee grounds. However, if you prefer a cleaner cup with fewer coffee particles, you can experiment with using a paper filter in the receptacle, although this is not traditional percolation.
I am a barista by profession hailing from NC. My journey began in my late teens when I started working as a barista in a local coffee shop. My passion for coffee quickly became evident as I immersed myself in the art of espresso extraction, latte art ...